

LMS
Everything for building and running your courses - organizing them into categories, authoring the actual course content, managing instructors and learners, and building quizzes/tests with results reporting.
Categories
Group your courses into categories (for example by topic or department) so learners can browse and find them more easily on your website.

.png)
WHAT YOU CAN DO HERE?
Explore the business at a glance.
Category Name - the name shown to students in the program directory (up to 30 characters)
Category Icon - pick a small picture/icon shown next to the category
Visibility - Published (visible to learners) or Draft (hidden from the site
Programs list - the courses currently assigned to this category; use "+ Add Programs" to attach more, or remove one from the list.
Created On / Last Modified - read-only dates shown once the category is saved.

How do I do it?
A simple path from login to insight.
1
Click "Add New Category"
2
Type a name and choose an icon.
3
Save the category.
4
Open the saved category and click "+ Add Programs" to attach courses to it
5
Set Visibility to Published when you're ready for learners to see it.
Courses/Program
This is where you build your actual courses, called "Programs" here. A Program is the whole course a learner joins or buys. Each Program is broken into Modules (like chapters), which can optionally have Submodules (sub-chapters) inside them, and every Module/Submodule holds Steps - the individual pieces of content a learner works through one at a time, such as a video, a piece of text, a downloadable file, or a quiz

WHAT YOU CAN DO HERE?
Explore the business at a glance.
Programs list - tabs for Published / Draft /Archived (each with a count), search box, and a table of Program name, thumbnail, price,status, date created, scheduling, and category.
Sequence column - up/down arrow buttons to reorder courses (this controls their display order on the public site); the arrows are disabled while a search term is active - clear
the search box to reorder.
Create New - a 4-step wizard: Name the program, choose Scheduling (Self-Paced or Scheduled), choose Duration (Unlimited or a Time Limit in days), and choose Pricing (Free or Paid with an amount).
Program row actions - Edit, Archive, Delete
Program page top bar - Preview (see how content looks to a learner), View Live Page and Copy Live Link (once published), Publish button, Invite Participants, and a menu for Edit
settings / Duplicate / Archive / Delete.
Overview tab - cover image, duration,
visibility, price, category, number of assigned instructors, and a setup checklist.
Content tab: Add Content menu - add a Module, or (from inside a module) a
Submodule, a Lesson, or a Quiz.
Content tab: per-module "Add Content" -Upload column (PDF, Video, Audio,File-SCORM is shown but not usable yet) and Create column (Heading, Text, Article, Link,Quiz - Live Test, Live Class, Assignment,Coding Test and Form are shown but not usable yet).
Content tab: module/submodule row -a status pill you click to set Draft, Scheduled (pick a publish date/time), or Published; expand/collapse; delete; drag to reorder.Setting a module to Draft also drafts every lesson inside it, and Admin Preview (and the learner-facing course) hides a draft module and its lessons completely, not just mark them unavailable.
Content tab: step (lesson) row -content-type badge, estimated time or video length, a freepreview toggle for video steps, its own status pill, delete, drag to reorder.
Content tab: footer bar - shows total course duration and total lesson count; changes save to draft automatically as you edit.
Step editor: Basic info - Step name, which Module/Submodule it belongs to (Section), and Estimated time to complete (for non-video steps).
Step editor: Video steps - embed a
YouTube/Vimeo/Facebook link or upload a video file; video duration; Free preview toggle with an optional preview-length cutoff; Allow download
toggle; closed captions (.vtt upload); Autoplay toggle; "Restriction on video consumption" toggle (blocks skipping ahead of what's already been watched); a lesson thumbnail (or
capture a frame from the video); Video stats (viewers, completions, completion rate, average watched %); "Video Step Settings" apply to every video in the course - Require watching videos (with a required watch %) and Autoplay next video.
Step editor: Quiz steps - question types are Multiple Choice and Checkboxes (build 2+answer options each and mark the correct
one(s)), Short Answer (ungraded free-text response; you can add an optional sample answer visible only to admins, for your own reference when reviewing submissions), and File Upload (ungraded, collects an uploaded
file); every question can also carry its own attached image or document; Grading setting - require a passing grade %, and a max number of attempts.
Step editor: PDF / Audio / File steps - upload the file directly.
Step editor: Link steps - a URL field; opens embedded for learners, with a fallback link if the destination blocks embedding
Step editor: Article / Text steps - a rich text content editor
Step editor: Article / Text steps - a rich text content editor
Step editor: Article / Text steps - a rich text content editor
Step editor: Availability Settings -Always Available, or Time Based with an available-from and available-till date/time
Module/Submodule editor - Title, parent module (for a submodule), Description, cover image, Dripping toggle (release this module a set number of days after a learner joins), Free preview cutoff minutes, and engagement overrides for that module.
Participants tab - the list of learners enrolled in this program: search, filter by status (In progress / Finished), Invite Participants (manually add someone with free unlimited access - they now receive an enrollment confirmation email automatically), each row shows performance %, date joined, pricing,
and a certificate issued/not-issued toggle; a Restrict Access / Restore Access action per participant lets you block just that one learner's access to this course without touching their plan or anyone else's access, even if the course came bundled in a plan they bought; view or manually check off a learner's step-by-step progress; remove a participant.
Certificate tab - the certificate design used when a learner completes this program; in the designer, use the Templates button in the left toolbar to start from a ready-made preset(Elegant or Royal) and then customize it, instead of designing from a blank canvas.
Settings tab - Program Name, Public URL (slug), Description, Cover image, Scheduling, Duration, Pricing, Level (Beginner/etc.), Visibility, Participation Limit (unlimited or a maximum number of participants), Content Settings (order learners must take steps in, require-watching-videos %, autoplay),
assign/manage Instructors, and Category
Engagement tab - course-wide toggles for Share Your Experience, Key Takeaways, Reviews, Q&A, Resources, and Comments (individual modules and lessons can override these).
How do I do it?
A simple path from login to insight.
1
Click "Create New" and step through the wizard: name, scheduling, duration, and pricing.
2
Open the new program and go to the Content tab.
3
Click "Add module" to create your first chapter.
4
Inside a module, click "Add Content" and choose a lesson type (Video, Article, Quiz, etc.) to build out its steps.
5
Fill in each step's content, then set its status to Published when ready.
6
Go to Settings to finish pricing/visibility, then click Publish on the program itself.
Instructors
Manage the instructor profiles that can be assigned to your courses.

WHAT YOU CAN DO HERE?
Explore the business at a glance.
Photo - upload a profile picturePhoto - upload a profile picture
Name - the instructor's display name
(required).
Email - contact email.
Bio - a short biography shown with their profile.
Program Count - how many courses this instructor is currently assigned to (shown in the list, and used for Delete's warning).
Info cards - Role Verification reminder,
Workload Balance (who's assigned to the most programs), and Activity Logs (most recent profile update)
How do I do it?
A simple path from login to insight.
1
Click "Add Instructor".
2
Upload a photo and fill in name, email, and bio.
3
Save.
4
Assign the instructor to a course from that course's Settings tab ("Instructors" section)
Learners
View and manage learner accounts, answer their questions, moderate community posts, and send broadcast messages. The page has four tabs: All Learners, Questions & Answers, Community Moderation, and Broadcast

WHAT YOU CAN DO HERE?
Explore the business at a glance.
All Learners tab: stat cards - Total Learners,Active, Pending, Suspended.
All Learners tab: search by name/email; filter by status, by course, and by subscription plan.
All Learners tab: Import CSV (file needs Name and Email columns) and Export CSV.
All Learners tab: per-learner row - click the name (or the eye icon) to open their detail page; status badge, enrolled/completed course counts,view details, Suspend/Reactivate,Remove (permanently deletes their account
and enrollment history).
Learner detail page: Enrollments section - Restrict Access / Restore Access on any of their courses (works whether the course came from a plan or was added manually, and only affects this one learner), plus an Add Course button to give this learner a specific course outside whatever plan they bought.
Questions & Answers tab - filter
Unanswered/All; type and submit an answer to a learner's question.
Community Moderation tab - view every post in the learner community feed and remove any that violate your rules.
Broadcast tab - compose a message (title,body, an optional image/video/audio attachment, an optional link); choose audience (All learners or specific selected learners); toggle sending by Email and/or Notification; optionally schedule it for later; view the history of past broadcasts.
How do I do it?
A simple path from login to insight.
1
To suspend a learner: open All Learners, find them, open the row menu, and click Suspend
2
To send a broadcast: open the Broadcast tab, write your title/body, pick the audience, choose Email/Notification, and click Send (or schedule it).
3
To answer a learner's question: open Questions & Answers, filter to Unanswered, type a reply, and submit.
Assessments
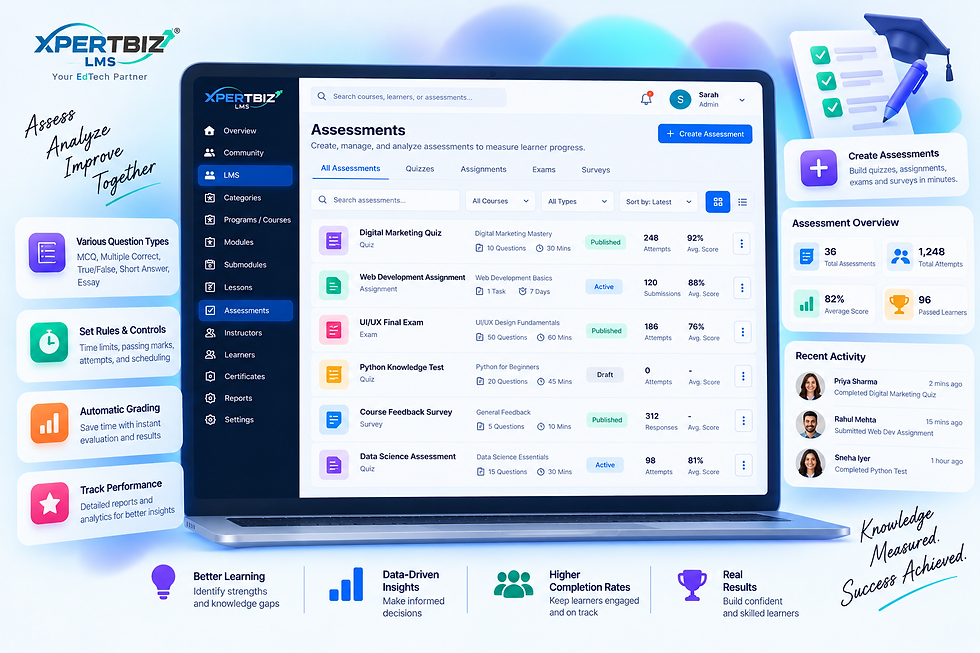
Build formal, standalone tests attached to a course - separate from the quick quizzes you can add as a lesson step - with full control over timing, attempts, navigation, and grading rules.
WHAT YOU CAN DO HERE?
Explore the business at a glance.
Course picker - assessments always belong to one course; pick it from the dropdown at the top before anything loads.
List - search, filter by status (Draft/Published), and a table of Assessment name/description,number of questions, pass %, and status.
Create Assessment - a 4-step wizard: Basic Info (name, description, learner instructions) → Connect to Course → Settings (time limit,attempts, pass %, navigation, randomization,results options) → Review
Assessment editor: Name, Description, Pass Percentage, Max Attempts, Instructions for Learners.
Assessment editor: Time Limit in minutes (leave blank for no limit).
Assessment editor: Navigation - Free (move between questions freely, with an option to allow going back) or Sequential (must answer in order).
Assessment editor: Randomization -
randomize question order and/or answer option order per learner
Assessment editor: Results - show results immediately after submission, and/or show the correct answers afterward
Question builder - Create Question or Add from Question Bank; drag to reorder; duplicate or delete a question
Question types - Single Choice, True/False,Multiple Select (with optional partial credit), Fill in the Blank (with case-sensitivity option), Short Answer (graded manually), Essay
(graded manually, with a grading rubric),Matching (left/right pairs),Ordering (put items in the right order), Numerical Answer (with a
tolerance range).
Per-question fields - explanation shown after answering, an optional hint, an optional image, points, negative marking points for a wrong answer, difficulty (Easy/Medium/Hard), topic, and tags.
Assessment actions -Publish/Unpublish,Delete (also deletes every learner's attempt history), and a shortcut to View Results.
How do I do it?
A simple path from login to insight.
1
Pick the course this assessment belongs to.
2
Click "Create Assessment" and complete the 4-step wizard.
3
In the editor, add questions one at a time (or pull existing ones from the Question Bank)
4
Set the pass percentage, attempt limit, and time limit.
5
Click Publish so learners can take it.
Question Bank
A searchable library of every question that exists across the selected course's assessments.Questions are created inside an assessment (or reused into one from here) - this page is a combined view for finding and reusing them.

WHAT YOU CAN DO HERE?
Explore the business at a glance.
Course picker - the bank is scoped to one course at a time.
Stat cards - total Questions, total
Assessments, and total Topics.
Search box, plus filters by question Type and Difficulty.
Table - select individual questions (or select all), sort by text / type / difficulty / points, preview a question.
How do I do it?
A simple path from login to insight.
1
Pick a course.
2
Search or filter to find the question you want.
3
Reuse it into another assessment via that assessment's "Add from Question Bank" option in its editor.
Assessment Results
Pass rates, average scores, and per-question difficulty for every lesson quiz and every standalone assessment in a course.

WHAT YOU CAN DO HERE?
Explore the business at a glance.
Course dropdown - choose which course's results to view
Left list - every lesson quiz and standalone assessment in that course.
Right panel stat cards - Unique Learners, Total Attempts, Pass Rate %, Average Score %
Question Difficulty table - for each question,how many answered it correctly out of how many attempted, with a color-coded correct rate bar (questions pending manual grading are
marked separately).
How do I do it?
A simple path from login to insight.
1
Pick a course from the dropdown
2
Click a quiz or assessment in the left-hand list.
3
Review the stat cards and the per-question difficulty breakdown on the right
POWERFUL LEARNING MANAGEMENT
Build, Manage, and Deliver Learning That Works.
Create structured learning experiences, manage your courses and instructors, and give learners everything they need to learn, progress, and succeed-all from one powerful LMS.
01
Build Structured Learning
Organize categories, programs, courses, modules, submodules, and lessons into clear learning journeys.
02
Manage Your Learning Ecosystem
Assign instructors, manage learners, control course access, and deliver engaging learning experiences.
03
Track Learning Progress
Create assessments, manage different question types, set grading rules, and analyze learner results.