
.png)
Setting
One-time setup: your business profile, integrations, staff access, and platform-wide rules
Company/Customer Profile
Stores your organization's official identity - branding, contact details, and tax information - used across the admin panel, invoices, and customer-facing pages. Fill this in first since other parts of the system pull from it.

.png)
WHAT YOU CAN DO HERE?
Explore the business at a glance.
Company Logo - the wordmark/logo image shown in the site header and footer; a wide logo works best since it displays at a fixed height.
Browser Favicon - the small icon shown in browser tabs; ideal size is 32x32px.
Company / Customer Name (required) - the official business name used throughout the system.
Website URL - your public website address.
Email ID (required) - the main contact/admin email for the business.
Mobile No (required) - a country code field plus the phone number, used as the primary contact number.
Registered Address (required) - full business address including city, state, and zip code,used for compliance and invoicing.
GSTIN Number (optional) - your GST
registration number, needed for tax-compliant invoicing in India.
PAN Card Number (optional) - your business PAN, also used for tax compliant invoicing in India.

How do I do it?
A simple path from login to insight.
1
Open Settings > Company /Customer Profile from the left menu.
2
Upload your Company Logo and Browser Favicon under Brand Identity.
3
Fill in Business Details: company name,website, email, mobile number, and registered address
4
Optionally add GSTIN and PAN under Tax & Compliance if you need tax-compliant invoices.
4
Click Save Changes (or Save as Draft to save without validating everything), or Cancel to discard edits.
Trainer Profile
Defines the public professional profile of the trainer/coach shown to learners across courses and the platform - photo, bio, credentials, and social links. A complete, polished profile builds trust and helps drive enrollments.

WHAT YOU CAN DO HERE?
Explore the business at a glance.
Avatar - the trainer's profile photo, shown as a circular image.
Full Name - the trainer's displayed name.
Title / Designation - the professional title shown under the name (e.g. 'Life Balance Coach').
Coaching Category - a dropdown to select the trainer's area of coaching from a predefined list.
Short Bio - a description of the trainer, limited to 500 characters, with a live character counter.
LinkedIn URL - link to the trainer's LinkedIn profile, shown as a social icon if filled in.
Twitter Profile - link to the trainer's Twitter/X profile.
YouTube Channel - link to the trainer's
YouTube channel.
Instagram Username - the trainer's Instagram handle.
Courses / Rating / Students (read-only stats) -automatically calculated counts shown in the live preview panel, not editable here.
How do I do it?
A simple path from login to insight.
1
Open Settings > Trainer Profile from the left menu.
2
Upload or change the Avatar photo.
3
Fill in Full Name, Title/Designation, and select a Coaching Category.
4
Write a Short Bio (up to 500 characters).
5
Add any social media links (LinkedIn, Twitter,YouTube, Instagram) you want shown publicly.
6
Check the Public Preview panel on the right,then click Save Changes.
Mobile App Configuration
Controls the text shown on the mobile app's splash screen and login screen, plus an optional 'update available' prompt for the app. Changes apply to every already-installed app the next time it's opened -no app store update required.

WHAT YOU CAN DO HERE?
Explore the business at a glance.
Display Name (required) - the name shown prominently on the splash screen (e.g. the trainer or business name)
Title / Role - a subtitle shown under the display name (e.g. 'Life Balance Coach').
Tagline - a short motivational quote or
description shown on the splash screen
Experience Badge - a short badge of
credibility shown on the splash screen (e.g. '5+ Years of Experience').
Latest Version - the current app version number; leaving this blank turns off the update prompt entirely.
Android Store URL - the Google Play Store link shown in the update banner for Android users.
iOS Store URL - the Apple App Store link shown in the update banner for iOS users.
How do I do it?
A simple path from login to insight.
1
Open Settings > Mobile App Configuration from the left menu
2
Fill in the Display Name, Title/Role, Tagline, and Experience Badge under Splash & Login Content.
3
Preview how the splash screen will look in the panel on the right.
4
If you want to prompt users to update, enter the Latest Version and the Android/iOS store URLs under App Update Prompt.
5
Click Save Changes.
User Management
Lets you create staff/admin roles with specific permissions, and add staff members to those roles so they can log into the admin panel with only the access they need. Has two tabs: Manage Roles & Permission and Manage Users.

WHAT YOU CAN DO HERE?
Explore the business at a glance.
Role Name (Manage Roles & Permission tab) - the name of a custom staff role (e.g. 'Course Coordinator').
Module Permissions - for each admin module(Dashboard, Community, LMS, Sales, Events,Consultations, Support, Gamification,Company/Customer Profile, Trainer Profile, User Management, Payment Gateway Setting,Website Builder, Security Logs, Engagement Settings, and more), three independent checkboxes: View, Edit, and Delete.
Select All - a shortcut link that turns on View,Edit, and Delete for every module at once.
Existing Roles list - shows all created roles with their member count, with Edit and Delete actions per role (a role with assigned staff cannot be deleted until they're reassigned).
Full Name (Manage Users tab, Add Staff Member form) - the new staff member's name.
Email Address - the staff member's email,used to send a welcome email (delivery isn't guaranteed, so the User ID should also be shared directly).
Role Assignment - a dropdown to assign one of the previously created roles to this staff member.
Set Password - the initial login password,minimum 8 characters with a mix of letters,numbers, and symbols; has a show/hide toggle.
Active Staff list - searchable list of all staff with their role, status (Active/Pending/Suspended), and a menu to Suspend/Reactivate or Remove them.
Stat cards - Total Staff, Active, Pending, and Suspended counts shown at the top of the Manage Users tab.
How do I do it?
A simple path from login to insight.
1
Open Settings > User Management from the left menu.
2
On the Manage Roles & Permission tab, enter a Role Name and tick View/Edit/Delete for each module the role should access, then click Save Role.
3
Switch to the Manage Users tab.
4
Fill in Full Name, Email Address, select the Role, and set a Password, then click Confirm & Invite Staff.
5
Copy the generated User ID shown after creation and share it with the staff member - this is what they use to log in, not their name or email.
6
Use the ... menu next to any staff member to Suspend, Reactivate, or Remove their access later.
Payment Gateway Setting
Connects your own Razorpay, Stripe, and/or PayPal accounts so buyers can pay for courses directly into your accounts. You can enable any combination of these three gateways; buyers only see the ones you've connected.

WHAT YOU CAN DO HERE?
Explore the business at a glance.
Provider tabs - switch between Razorpay,Stripe, and PayPal; each has its own separate credentials form
Connection status banner - shows whether he selected gateway is Connected or Not connected.
Key ID / Publishable Key / Client ID - the public identifier for the gateway (label and format differ per provider: Razorpay 'Key ID' starting with rzp_test_/rzp_live_, Stripe 'Publishable Key' starting with pk_test_/pk_live_, PayPal 'Client ID').
Key Secret / Secret Key / Client Secret - the private secret key for the gateway; stored securely server-side and shown masked - you only need to re-enter it if changing it.
Webhook Secret (Razorpay only) - the signing secret from a Razorpay webhook pointed at this server's /api/webhooks/razorpay endpoint, subscribed to subscription.* events; needed for subscription payment updates to be received correctly.
Step-by-step instructions and an FAQ
accordion - shown per provider to help you find the right keys in that provider's own dashboard.
How do I do it?
A simple path from login to insight.
1
Open Settings > Payment Gateway Setting from the left menu.
2
Choose a provider tab (Razorpay, Stripe, or PayPal)
3
Follow the 3-step instructions shown to find your keys in that provider's dashboard.
4
Paste the Key ID and Key Secret (and Webhook Secret for Razorpay) into the form.
5
Click Save. The status banner should switch to 'Connected'.
6
Repeat for any other gateways you want to offer.
Zoom Integration
Connects a Zoom account so the system can automatically create real, dated Zoom meetings for any consultation type set to auto-generate a Zoom link - no manual meeting creation needed.

WHAT YOU CAN DO HERE?
Explore the business at a glance.
Account ID - your Zoom account's Account ID, from a Server-to-Server OAuth app in the Zoom Marketplace
Client ID - the Client ID of that Server-to Server OAuth app.
Client Secret - the app's Client Secret;
masked, only re-enter to change it.
Webhook URL (read-only, auto-generated) - a copyable URL to paste into Zoom's Event Subscriptions settings.
Secret Token (optional) - the signing token Zoom gives you when setting up Event Subscriptions for Meeting Started/Meeting Ended events; enabling this gives a real 'LIVE' badge on the community feed instead of one based only on the scheduled time.
Connection status banner - shows whether Zoom is Connected or Not connected.
How do I do it?
A simple path from login to insight.
1
Open Settings > Zoom Integration from the left menu
2
Go to marketplace.zoom.us, sign in with the account that should host meetings, and create a Server-to-Server OAuth app.
3
Copy the Account ID, Client ID, and Client Secret into the form and click Save.
4
(Optional) In the same Zoom app, turn on Feature > Event Subscriptions, add the Webhook URL shown on this page with the
Meeting Started/Meeting Ended events, then paste the Secret Token here and Save again for a real live-status badge.
YouTube Integration
Connects a YouTube Data API key so any published online event whose join link is a YouTube video shows a real 'LIVE' badge on the community feed the moment the broadcast actually starts, instead of relying on the scheduled time alone.

WHAT YOU CAN DO HERE?
Explore the business at a glance.
API Key - a YouTube Data API v3 key
generated from a Google Cloud project; masked once saved, only re-enter to change it.
Connection status banner - shows whether YouTube is Connected or Not connected.
How do I do it?
A simple path from login to insight.
1
Open Settings > YouTube Integration from the left menu
2
Go to console.cloud.google.com and create (or select) a project
3
Enable the 'YouTube Data API v3' under APIs & Services > Library
4
Create an API key under APIs & Services > Credentials
5
Paste the API Key into the form and click Save.
Website Builder
A large, tabbed workspace for managing everything about your public marketing website and mobile app front-end - separate from the core LMS settings, and detailed enough to warrant its own dedicated documentation below.

WHAT YOU CAN DO HERE?
Explore the business at a glance.
Templates - choose an overall website
template/layout
Theme - pick the color theme/scheme applied across the public site.
Homepage Slider - manage the hero banner slides shown at the top of the public homepage.
Community Slider - manage the banner shown at the top of the Community feed.
App Launch Banner - manage the full-screen banner shown when the mobile app first launches.
Homepage Content - edit the text/content blocks that appear on the homepage.
Page Copy - edit page-level marketing
copy/text used across the site.
Site Identity - manage site-wide identity settings (distinct from Company Profile) shown on the public site; a Navigation links card lets you hide any of Home, Courses, Pricing Plan, Shop, Book a Session, or Contact Us from the public header/footer nav with a checkbox each- turning off Contact Us also takes the /contact page itself offline (visitors are redirected to Home), while the other hidden links stay reachable by direct URL, just not listed in the nav.
Social Links - manage links to your social media profiles shown publicly.
Chat Widget - configure a live chat widget shown on the public site.
Lead Popups - configure popups used to capture visitor leads.
Consent Management - configure cookie/data consent prompts and purposes shown to visitors.
Website Policies - manage legal policy pages for the website (e.g. privacy policy, terms).
Mobile App Policies - manage legal policy pages shown inside the mobile app.
How do I do it?
A simple path from login to insight.
1
Open Settings > Website Builder from the left menu.
2
Use the tab bar to switch between the sub areas listed above (Templates, Theme, sliders, content, policies, etc.)
3
Make your changes within the selected tab and save using that tab's own save action.
Security Logs
A read-only log of suspicious activity detected while learners watch protected course video - such as switching tabs, right-clicking, copying, or pressing Print Screen. It's a best-effort deterrent, not a guarantee against screen recording, since no browser can fully block that.

WHAT YOU CAN DO HERE?
Explore the business at a glance.
Learner column - the name and email of the learner who triggered the violation.
Violation column - the type of suspicious activity: 'Switched away from video' (tab hidden), 'Right-click attempt', 'Copy attempt', 'Print Screen key pressed', or 'Switched to another app/window' (window blur).
Course / Lesson column - which course and lesson the violation happened in.
When column - the date and time the violation was recorded.
How do I do it?
A simple path from login to insight.
1
Open Settings > Security Logs from the left menu.
2
Review the table of recorded violations - it's sorted with the most relevant entries first.
3
Use the Learner, Violation type, and Course/Lesson columns to identify patterns of misuse.
4
This page is view-only; there is nothing to configure or save here.
Engagement Settings
Controls platform-wide learner engagement behavior for course video: how long non-enrolled visitors can preview a lesson, video watermarking for content protection, which automated engagement emails are sent, and the list of review platforms shown to learners. Note: the individual lesson features (Share Your Experience, Key Takeaways, Reviews, Q&A, Resources, Comments) are turned on/off per course from that course's own Engagement tab, not here.

WHAT YOU CAN DO HERE?
Explore the business at a glance.
Free Preview Length - how many minutes (1-30) a prospective (non-enrolled) learner can watch a free-preview lesson on a course's public page before playback stops and prompts them to enroll.
Video Watermark Mode - choose 'Always visible' (watermark stays on screen, repositioning periodically), 'Dynamic watermark' (shows at random intervals/locations), or 'Off'; the watermark overlays the viewing learner's identity so a Screen-recorded copy stays traceable.
Display watermark for (seconds) - when Dynamic mode is selected, how many seconds the watermark stays visible each time it appears.
Display watermark after every (seconds) -when Dynamic mode is selected, how often the watermark reappears.
Birthday emails - toggle to automatically send every active student a birthday email.
New lesson published emails - toggle to notify everyone already enrolled in a course whenever a new lesson is published.
Plan expiry alerts - toggle to warn a student 5 days before their pricing plan access expires.
Review Platforms list - add, edit, reorder,enable/disable, or remove external review destinations (e.g. Google, Trustpilot) shown as 'Leave a Review' buttons under lessons; one platform can be marked as the default, which is highlighted first for learners.
How do I do it?
A simple path from login to insight.
1
Open Settings > Engagement Settings from the left menu.
2
Set the Free Preview Length in minutes and click Save.
3
Choose a Watermark Mode; if Dynamic,adjust the display-for and display-every second values, then Save.
4
Toggle the Automated Emails you want enabled (birthday, new lesson, plan expiry).
5
Under Review Platforms, add a platform name and URL and click Add, use the arrows to reorder, the star icon to set the default, and the checkbox/trash icon to enable or
remove one.
6
For per-lesson engagement features (Q&A,Comments, Resources, etc.), go to the relevant course's own Engagement tab instead.
Upload Settings
Sets the maximum file size allowed for each type of upload (images, videos, documents, audio) across the entire site. These limits are enforced everywhere that file type is uploaded -course content,community posts, messages, support tickets, and more.
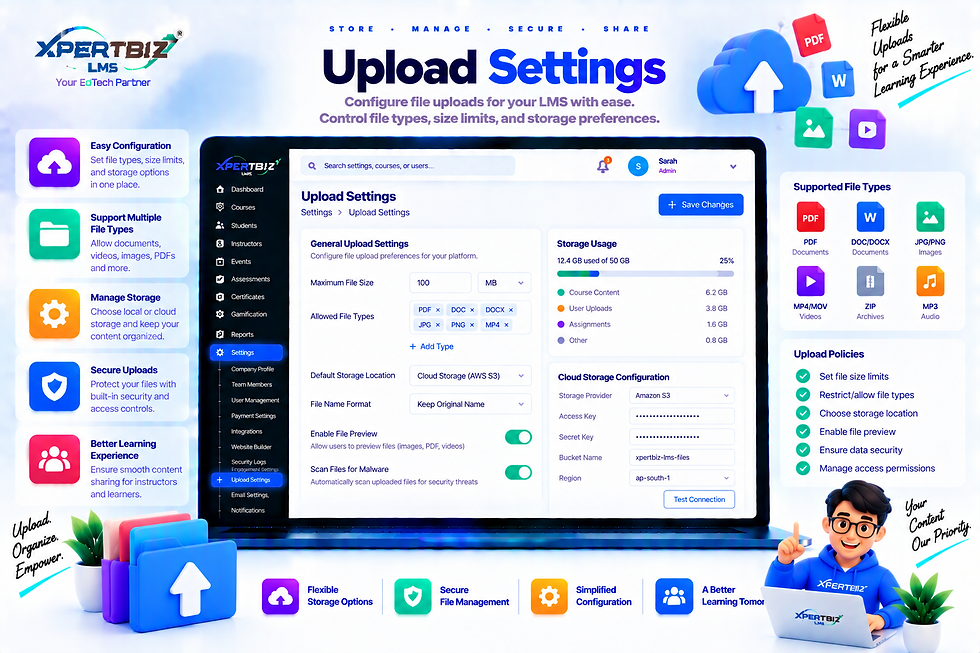
WHAT YOU CAN DO HERE?
Explore the business at a glance.
Images - max file size in MB for logos,
thumbnails, avatars, and banners (PNG, JPEG,WebP, SVG, GIF); allows up to 50MB.
Videos - max file size in MB for lesson videos and intro videos (MP4, WebM, Ogg); allows up to 5000MB (5GB).
Documents & attachments - max file size in MB for PDFs, lesson resources, and message/support attachments; allows up to 500MB.
Audio - max file size in MB for lesson audio clips (MP3, WAV, Ogg, M4A); allows up to 500MB.
How do I do it?
A simple path from login to insight.
1
Open Settings > Upload Settings from the left menu.
2
Find the media type you want to change(Images, Videos, Documents, or Audio)
3
Enter a new maximum size in MB (minimum 1MB, up to that type's cap).
4
Click Save next to that specific media type - each type saves independently.
Email (SMTP) Settings
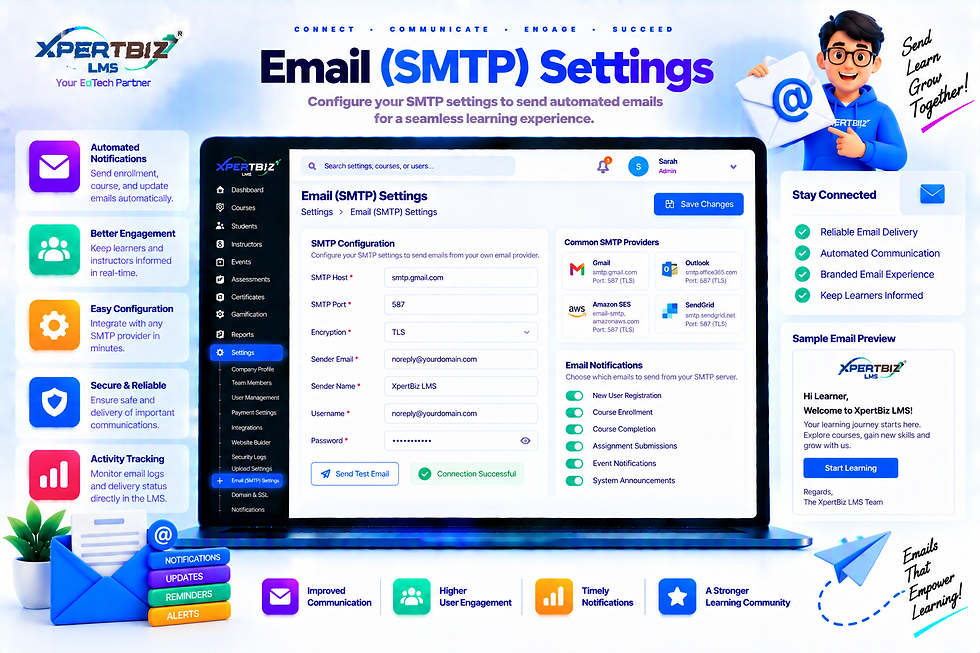
Connects an outgoing email account (Gmail, SendGrid, your own mail server, etc.) so the platform can actually deliver OTPs, receipts, certificates, notifications, and email campaigns. Without this configured correctly, learners may not receive important emails.
%20Settings.png)
WHAT YOU CAN DO HERE?
Explore the business at a glance.
Use these settings instead of the server's default SMTP config - checkbox to enable/disable using your own custom SMTP settings.
SMTP Host - the mail server address (e.g.smtp.gmail.com)
Port - the SMTP port number (commonly 587).
Username - the SMTP account
username/email used to authenticate.
Password / App Password - the SMTP account password (many providers like Gmail require an 'app password' rather than your normal login password); masked, with a show/hide toggle,only re-enter to change it.
From - the display name and email address that recipients see as the sender (e.g. 'Amruta Surdas <no-reply@amrutasurdas.in>').
Send a test email - a separate tool to enter a recipient address and confirm your saved SMTP settings actually work; save your settings first before testing.
How do I do it?
A simple path from login to insight.
1
Open Settings > Email (SMTP) Settings from the left menu.
2
Tick 'Use these settings instead of the server's default SMTP config' if you want to override the default.
3
Fill in SMTP Host, Port, Username, Password, and the From address.
4
Click Save.
5
Enter a recipient email under 'Send a test email' and click Send test email to confirm delivery actually works.
CONFIGURE. CONTROL. CUSTOMIZE.
Everything You Need to Run Your Learning Business Your Way.
Manage your business identity, team access, integrations, website, security, and platform-wide settings from one centralized hub.
01
Keep Your Brand Consistent
Manage company details, branding, trainer profiles, website identity, and public-facing information in one place.
02
Control Who Can Do What
Create staff roles and assign specific permissions so every team member gets the right level of access.
03
Connect and Protect Your Platform
Configure payment gateways, communication tools, website settings, security logs, uploads, and other essential platform controls.